Now comes the post I know you’re all waiting for–the one with all the food! As interesting as it is, I’m sure, to read about why we decided to give the Whole30 a whirl and what we felt while adhering to said Whole30, at the end of the day what matters most is the food, right? Well, wait no longer…just read on! Before you do, though, a little note: To save time and space, not every meal or recipe is recounted. This post focuses largely on our successes. I didn’t take pictures of the meals that didn’t work, after all. Who wants to remember those with a photograph? For recipes that correspond with the images, follow the links–most will take you out into the world wide web where we found inspiration. Others will transport you directly to recipes of our own, right here on happy food.
 Dinner, Day 1: Since we hadn’t yet stocked the kitchen with compliant ingredients, Bryce found inspiration in the cupboards and online. He threw together one of my favorite dishes of the month, an amazing Moroccan Chicken, substituting thighs for whole chickens, replacing non-compliant ingredients with acceptable ones, and adding capers, artichoke hearts, and a can of diced tomatoes. The picture barely does the meal justice–it filled the house with warm aromas and tasted even better.
Day 2: Let’s go shopping! After enjoying some leftover Moroccan Chicken Stew for breakfast, Bryce and I ventured out to conduct the shop of all shops and stock our stores with Whole30 compliant ingredients. Almost $400 later and we were set for the month (and beyond). Yes, Whole30 required an initial monetary investment that was quite considerable–but what better investment than one’s own health? Besides which, the money we saved by not eating out all month helped us gradually recoup that investment. Hindsight being, you know, 20/20, I should have taken a photograph of the goodies we bought that Saturday: unrefined coconut oil, avocado oil, light tasting olive oil, unsweetened coconut flakes, eggs for days, pork shoulder, grass-fed organic ground beef, coconut aminos, spinach, sweet potatoes, jicama, grapefruit…the list goes on, and I am rambling.
To help make our first week as successful as possible, Bryce conducted a lot of Internet research the month beforehand. One of the blogs he discovered, Melissa “Melicious” Joulwan’s The Clothes Make the Girl, offered a lot of great tips and recipes, including a Whole30 week 1 meal plan. Bryce figured, and I quite agreed with him, that having prepared Whole30 foods at the ready would increase our chance of success, and because we went shopping, we could get down to business.
Lunch, Day 2: While Bryce started cooking, I whipped up some Curried Tuna Salad Lettuce Wraps for lunch. I mixed together some tuna, homemade mayo, onions, celery, sunflower seeds, salt, pepper, and hot curry powder, serving the mixture in leaves of crispy romaine lettuce. The refreshing snap of the lettuce served as an excellent vessel for the spicy goodness of the tuna salad, and we didn’t even miss bread. What started as an experiment turned out to be a recurring Whole30 recipe.
TIP: The homemade mayo recipe from The Clothes Make the Girl (follow link above) is simple to make and quite easily the best mayonnaise I’ve ever tasted. We will never go back to store bought mayo again.
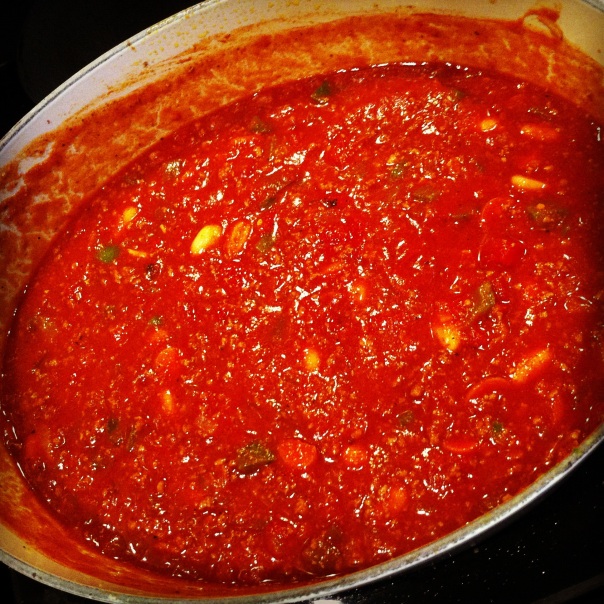
 Dinner, Day 2: The crux of the Week 1 plan suggests spending an afternoon in the kitchen cooking up foods you can eat all week long. It involved creating specific meals (like the amazing Chocolate Chili, pictured) but also focused on prepping piece-meal items (like Italian pork roast and roasted veggies) that you could mix-and-match come meal time. At the end of our first cooking day, we enjoyed the savory Chocolate Chili mentioned earlier, spooned over roasted spaghetti squash.
 Breakfast, Day 3: With a fully stocked kitchen, Bryce and I were back in business for breakfast (read: we had eggs). Having made a broccoli scramble on Day 1, I thought I’d mix things up on Day 3 with a spinach & onion frittata. In theory, the plan was solid–sautéed onions and fresh baby spinach floating in a pillowy blanket of eggs. But, as we dug in, Bryce and I found that the iron flavor brought by the fresh spinach was far too intense and frozen spinach would be better for future recipes.
 Lunch, Day 3: One of the many upsides to spending an afternoon preparing food for the week is the numerous options the spread provides. Take this Slow-cooker Italian Pork Roast, another excellent recipe from The Clothes Makes the Girl’s week 1 meal plan, for example. The melt-in-your-mouth pork, flavored with garlic and Italian seasonings, centered meals like the one pictured while also inspiring several other dishes later in the week (more on those later).
 Dinner, Day 3: Bryce, having spent most of Day 2 in the kitchen, tasked me with putting something together for dinner. Challenge accepted! Using available ready-made ingredients and our new wok (yay!), I threw together a Whole30 version of Chinese Take-out Beef with Broccoli. You may wonder, how do you make Chinese take-out without soy sauce? It’s not as hard as you might think. I combined date paste (sweetness) with coconut aminos (umami) and Frank’s Hot Sauce (spice).
 Breakfast, Day 4: To prevent myself from getting tired of eggs, I sought alternatives online while bouncing from Pinterest to Instagram. I eventually ran across a breakfast bowl consisting primarily of sliced bananas and almond butter. Eureka–a tasty way to break up day after day of eggs! My favorite combination = bananas + crunchy almond butter + toasted & salted pecans + unsweetened coconut flakes + blueberries + a dusting of ground cinnamon. So yummy, I still make them.
 Breakfast, Day 5: Another exercise in egg alternatives grew out of the Whole30 program’s invitation to rethink meals entirely. Why does breakfast have to fit a prescription? Truthfully, it doesn’t, which is partly what makes Whole30 life changing. So, I started day 5 with a salad: spinach topped with cherry tomatoes, diced onion, sliced avocado, and cilantro–dressed with fresh lime juice, kosher salt, and fresh-cracked pepper. I enjoyed this dish so much, I added it to my morning rotation.
 Dinner, Day 5: Staring into the abyss of the refrigerator at dinner time and wondering what to make, inspiration suddenly struck–Sweet Potato Shepherd’s Pie! The best part? The baked sweet potatoes and ground beef browned with onions were ready to go! I adjusted the recipe by taking out the cauliflower (we didn’t have any), replacing the beef stock with chicken stock (we couldn’t find compliant beef stock), and using individual serving crocks. So delicious…and filling.
 Breakfast, Day 6: Eggs were back on the menu, and one of the many wonderful things about them is versatility. I thought, why not combine eggs with a spinach salad? So, I crisped up some sliced bacon and fried two eggs to serve over a handful of fresh baby spinach. No oil or vinegar needed! The warm, runny, rich yolk created a creamy dressing of its own, seasoned simply with salt and pepper. With a half grapefruit and cup of black coffee, it was a true, Whole30 breakfast of champions.
 Breakfast, Day 9: There seems to be a theme developing with a heavy focus on breakfast. Not surprising, considering Whole30 completely upended my morning routine. Always looking for new egg dishes, inspiration struck once again when I saw sweet potatoes, Italian pork roast, onions, peppers, celery, and eggs in the fully stocked fridge. Let’s make hash! The sweetness of the potatoes combined perfectly with the savory pork and rich eggs to start the day off right.
 Lunch, Day 9: After watching his students graduate from James Madison University, Bryce came home and made the two of us another delicious lettuce wrap lunch. Using chicken breasts prepared according to The Clothes Make the Girl (“The Best Chicken You Will Ever Eat. Ever.“), he stirred together diced chicken, raisins, cilantro, red onion, and homemade mayo before serving it in bibb lettuce. The seasoning from the chicken provided plenty of flavor–another Whole30 win.
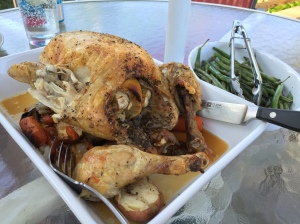 Dinner, Day 9: By the ninth day, Bryce and I had been through a few ups and downs but really began hitting our Whole30 stride. In celebration, I went all out and turned to one of our favorite Food Network personalities, Ina Garten, for her Perfect Roast Chicken recipe. We didn’t have any fennel, so we compensated by adding extra carrots, onions, and potatoes. Eating roast chicken with lemon and garlic over roasted root vegetables with a side of green beans on the deck…how bad could that be?
TIP: There are many great recipes out there that are pretty darn Whole30 compliant to begin with that require only minor tweaks, much like Ina’s Perfect Roast Chicken recipe. The only substitution we needed to make was swapping the butter out for ghee, otherwise the recipe is wholly Whole30 (Batman). If you’re considering Whole30, I recommend flipping through your favorite recipes. You might be surprised to find some that can easily be adjusted to fit within the program parameters.
 Breakfast, Day 10: If you read my previous posts about our Whole30 journey, you know that by week two I had grown frustrated with breakfast. I despised spending 30-45 minutes preparing and cooking my first meal of the day. The awesome answer to my morning meltdown came in the form of a Whole30 Breakfast Casserole. Once cooked and properly cooled, it made for an easy breakfast. Pictured is the original, chock full of eggs, homemade pork sausage, mushrooms, onions, and spinach.
TIP: The breakfast casserole remains one our top five Whole30 meals, not only because it tastes great but also because it lends itself to endless possibilities. Once you get the hang of recipes like this one, play with the ingredients. Experimenting provides variation and a certain amount of fun while also preventing tastebud boredom. We tried numerous versions of the breakfast casserole, each of them scrumdiddlyumptious, but none quite as good as what Bryce affectionately calls the Most Amazing Breakfast Casserole.
 Dinner, Day 11: As you most intelligently derived from my blog, Bryce and I enjoy the Food Network and gravitate toward several of its stars when researching meal ideas. Enter Pioneer Woman Ree Drummond and her Coconut Curry Shrimp. Of course, slight modifications were necessary–date paste instead of honey and roasted spaghetti squash instead of basmati rice. And we prefer cilantro over basil. Talk about flavorful! Another one of my top five Whole30 meals.
 Dinner, Day 14: Our good friend Dianna came from Minnesota to visit us and graciously tolerated our Whole30-ness. With recipes like Easy Paleo Homestyle Meatloaf topped with fully acceptable Prosciutto (Bryce’s idea), I think we succeeded in honoring our guest as well as the stipulations of the program. We kept things appealing, compliant, no-nonsense, and tantalizingly tasty. Who wants to spend all day in the kitchen when the Shenandoah National Park is calling?
Whole30 food fail: I attempted to make some coleslaw to pair with the meatloaf, leaving out the sugar and adding apple juice in addition to the apple cider vinegar. I don’t care who you are, you cannot make a successful coleslaw without sugar! Apple juice as a substitute just doesn’t cut it.
 Dinner, Day 15: Happy birthday, Dianna! Let’s celebrate with Turkey Chili, using my own tried and true recipe (sans any off-program ingredients like beans, brown sugar, and alcohol, of course). Oh, and let’s top it with sliced avocado, diced onion, and fresh cilantro instead of Fritos corn chips, shredded cheese, and sour cream. You know what? I didn’t miss those contraband toppings one bit. Turns out cheese is often used to add salt to recipes–so why not just use salt?
 Dinner, Day 21: Facebook feeds can be annoying. Every once in a while, though, a featured post piques my interest and I click that link. Such was the case with this Turmeric Lime Chicken recipe from The Splendid Table, one of our favorite NPR programs. It could not have appeared at a more opportune time, as Bryce & I were constantly looking for new recipes. Served with a side of noodled zucchini sautéed in cherry tomatoes, garlic, and olive oil, we were certainly glad we tried this one!
 Dinner, Day 22: What is my #1 favorite Whole30 meal, you wonder? The answer may surprise you as much as it surprised me: Oven Roasted Potatoes, Onions, and Boar’s Head Kielbasa with Sauerkraut. (I mention Boar’s Head here because of its compliance.) The combination of the salty sausage, heartiness of the potatoes, sweetness of the onions, tanginess of the mustard sauce, and sour bite of the sauerkraut married to form a most perfect union. My mouth is watering (again).
 Dinner, Day 23: While traversing Whole30 it’s fun to meet up with fellow travelers. No one better understands the rocky path, and you get to swap stories both triumphant and tragic. Such was the case when Bryce and I enjoyed a four-course dinner with our friends, Ian and Katie. The kingly meal included guacamole with jicama, Caesar salad, roasted capon & potatoes with multicolored carrots & mashed potatoes, and peach cobbler. Over the top? No question. Worth it? Definitely.
SIDE NOTES On capon: Never having eaten rooster before, I found Ian & Katie’s version deliciously decadent–the crispy skin in particular. The recipe they used was simply fantastic, and I look forward to having it again in the future.
On mashed potatoes: To be completely honest, I never truly loved or even liked them as they typically tasted bland and had a paste-like consistency. While on Whole30, though, I developed a newfound appreciation for mashed potatoes. The trick? No cream or milk needed…just boil some cut up potatoes and then blend them with garlic, ghee, salt, pepper, and a little of the cooking liquid until smooth using an electric hand mixer. I don’t even peel the potatoes…the skins are where many of the nutrients are, anyway. For amped-up, back-of-the-nose spiciness, stir in some prepared ground horseradish. Yummy!
On the peach cobbler: The Whole30 guidelines specifically state not to recreate compliant versions of non-compliant baked goodies, because it completely misses the point of the program. But we wanted to end our special meal with something sweet, so we went ahead and bent the rules anyway. Yet, even when taking out the vanilla extract and a sweetener substitute, the end result left something to be desired. Lesson learned!
 Lunch, Day 25: Chinese take-out food proved quite an obstacle as it’s usually laden with forbidden fruits. We kept looking for adapted recipes to try, though, since it’s a favorite cuisine of ours. Bryce, the ever resourceful researcher, found an excellent Hot and Sour Soup bursting with umami that satisfied our cravings. To keep it Whole30-approved, the only correction Bryce made was replacing the honey with apple juice and extra vinegar. We also opted for water chestnuts instead of bamboo shoots.
 Dinner, Day 25: Memorial Day means summer, and summer means grilling & eating out on the deck. What better way to start the season than with Grilled Balsamic Mustard Salmon, Ina Garten’s tomato salad without the feta cheese, and mashed potatoes (I’ll have mine with horseradish, please)? I couldn’t think of any better ways to kick summer off, either. Well, okay, maybe a gin & tonic and some ice cream could. Only a few days left to go, though, so we just said no to temptation.
 Dinner, Day 26: The dinner of Pan Fried Chicken Thighs and Roasted Zucchini & Yellow Squash that Bryce prepared near the end of our journey rounds out my top five favorite Whole30 meals. The fried chicken thighs felt like a guilty treat, but dredging them in well-seasoned almond flour and skillet-frying them in coconut oil proved a much healthier alternative to fast food. My sense of guilt was therefore (mostly) unfounded. Buffalo style with Frank’s Hot Sauce? Yes, please! Absolutely craveable.
Whole30 food fail: On day 28, Bryce spent the better part of an afternoon making Anne Burrell’s amazing bolognese sauce, complex and layered with flavor. It is intense and lip-smackingly delicious, the real deal. But when we served it over squash that just wouldn’t cooperate with the noodler and some leftover roasted spaghetti squash, we set ourselves up for nothing but disappointment…kind of like going to a Fleetwood Mac concert where Justin Bieber had replaced Mick Fleetwood. Not okay.
In the six weeks or so since our Whole30 adventure officially came to an end, Bryce and I have reintegrated some formerly forbidden foods and old favorites but adhere by and large to the plan guidelines. So, I drink my coffee with a little cream and sugar every morning, but no more Fruity Pebbles. The breakfast casserole tastes so much better and keeps me going strong until lunch time. I avoid most soy products but not peanut products. I occasionally indulge in ice cream and cocktails. I wrap tacos in crunchy, yellow corn shells instead of lettuce and serve guacamole with jicama AND tortilla chips. Burgers with cheese? Sure, but still no bun. On that note, Bryce and I went to Red Robin not too long after day 30, and we both wondered what the heck we used to love about the food so much. It was just tasteless and unsatisfying. Turns out pizza isn’t as good as it once was, either. Probably because it provides little nutritional value and therefore results in over-consumption (and therefore uncomfortable bloating). Freshly popped popcorn drizzled with melted butter and salt is a different story, though, and still one of my favorite foods, one I’ll probably never give up entirely.
Well, there you have the rather lengthy run down of the great meals and delicious foods we ate while livin’ la vida Whole30 (and even a couple failures). This post has been a labor of love, taking nearly an entire month to complete, and I hope it was worth the wait.

